Ubuntu 22.04 | Install Bind DNS Server
Adventures in the LXD Lab | Name Resolution Services
One of the core services that all devices browsing the internet or accessing resources on the network must have is the ability to resolve IP addresses to host names. This is often taken for granted and goes unnoticed by users who are only concerned with getting to their favorite social media site. Without DNS, users would have to remember IP addresses rather than URL’s – and users (well, humans in general) are not great at remembering 4 octets of numbers separated by 3 dots, never mind IPv6.
Installing Bind and DNSUtils
Installing the necessary software is rather uneventful and consists of one command. It is the configuration and operation of Bind that requires a lot of understanding and patients. I am going to go through the installation and basic configuration to get the DNS server installed and configured with the zones that represent my LXD lab. I will also be configuring reverse zones as well as a secondary Bind server for redundancy. The setup will be authoritative for the zone (domain) linfra.loc – which is what I am using for this lab. It will also perform recursion to answer queries for domains it is not authoritative for by forwarding those requests to internet name server of my choosing (forwarders).
# Installing Bind and dnsutils
jason@ns1:~$ sudo apt install bind9 dnsutils
As mentioned above, installation is rather uneventful and consists of a single command. At this point the DNS server is installed and running, but not configured to do anything particularly useful (like answer queries). Next, lets get some of the basics configured and perform some initial testing.
Configuring Bind
There are 2 files that need to be modified first before starting to configure zones and records. You should adjust the changes to match your environment. Those files are as follows:
/etc/bind/named.conf.local
/etc/bind/named.conf.options
# Set configuration directives in /etc/named/named.conf.options
jason@ns1:~$ sudo vi /etc/bind/named.conf.options

//# ACL to allow my local LAN to query the server for name resolution:
acl linfra-lan {
	172.16.1.0/24;
	172.16.2.0/24;
	10.130.115.0/24;
};

//# Options and directives to allow queries, recursion and zone transfer:
options {
	directory "/var/cache/bind";

	recursion yes;
	allow-recursion { linfra-lan; };
	listen-on { any; };
	allow-transfer { 172.16.2.11; 10.130.115.11; };

	forwarders {
		208.67.222.222;
		8.8.8.8;
		208.67.220.220;
		8.8.4.4;
		1.1.1.1;
		1.0.0.1;
		};

	dnssec-validation no;
	listen-on-v6 { any; };
};

//# Configuration to enable additional logging. (optional).
logging {
        channel transfers {
            file "/var/log/bind/transfers" versions 3 size 10M;
            print-time yes;
            severity info;
        };
        channel notify {
            file "/var/log/bind/notify" versions 3 size 10M;
            print-time yes;
            severity info;
        };
        channel dnssec {
            file "/var/log/bind/dnssec" versions 3 size 10M;
            print-time yes;
            severity info;
        };
        channel query {
            file "/var/log/bind/query" versions 5 size 10M;
            print-time yes;
            severity info;
        };
        channel general {
            file "/var/log/bind/general" versions 3 size 10M;
        print-time yes;
        severity info;
        };
    channel slog {
        syslog security;
        severity info;
    };
        category xfer-out { transfers; slog; };
        category xfer-in { transfers; slog; };
        category notify { notify; };

        category lame-servers { general; };
        category config { general; };
        category default { general; };
        category security { general; slog; };
        category dnssec { dnssec; };

        // category queries { query; };
};
You will notice in the configuration above that there is a portion for logging. By default, bind will log to /var/log/syslog. My configuration adds additional log files and a directory to house them (/var/log/bind). This is completely optional and can be excluded from the configuration. If you choose to take this route as well (optional) you must configure AppArmor to allow the logging as well as setup the logging directory manually with the correct permissions, as follows.
## This is optional | only necessary if you configured logging ##
# Create the logging directory
jason@ns1:~$ sudo mkdir /var/log/bind

# Set the appropriate permissions on the log directory
jason@ns1:~$ sudo chown bind /var/log/bind/

# Edit AppArmor configuration to allow logging
jason@ns1:~$ sudo vi /etc/apparmor.d/usr.sbin.named

......
  # /etc/bind should be read-only for bind
  # /var/lib/bind is for dynamically updated zone (and journal) files.
  # /var/cache/bind is for slave/stub data, since we're not the origin of it.
  # See /usr/share/doc/bind9/README.Debian.gz
  /etc/bind/** r,
  /var/lib/bind/** rw,
  /var/lib/bind/ rw,
  /var/cache/bind/** lrw,
  /var/cache/bind/ rw,
  /var/log/bind/** rw,
  /var/log/bind/ rw,
......

# Restart the AppArmor service
jason@ns1:~$ sudo systemctl restart apparmor.service
Now that I have configured all of the options that I want enabled on my server, it is time to edit the /etc/bind/named.conf.local file. This is where we will define information about the zones that this server will host. The files mentioned in this configuration do not yet exist. I will create them from the templates provided with the bind installation in the sections that follow.
# Set configuration directives in /etc/named/named.conf.local
jason@ns1:~$ vi /etc/bind/named.conf.local
//
// Do any local configuration here
//
// Consider adding the 1918 zones here, if they are not used in your
// organization
//include "/etc/bind/zones.rfc1918";
zone "linfra.loc" {
type primary;
file "/etc/bind/zones/db.linfra.loc";
allow-transfer { 172.16.2.11; 10.130.115.11; };
};
zone "2.16.172.in-addr.arpa" {
type primary;
file "/etc/bind/zones/db.2.16.172";
allow-transfer { 172.16.2.11; 10.130.115.11; };
};
zone "1.16.172.in-addr.arpa" {
type primary;
file "/etc/bind/zones/db.1.16.172";
allow-transfer { 172.16.2.11; 10.130.115.11; };
};
zone "115.130.10.in-addr.arpa" {
type primary;
file "/etc/bind/zones/db.115.130.10";
allow-transfer { 172.16.2.11; 10.130.115.11; };
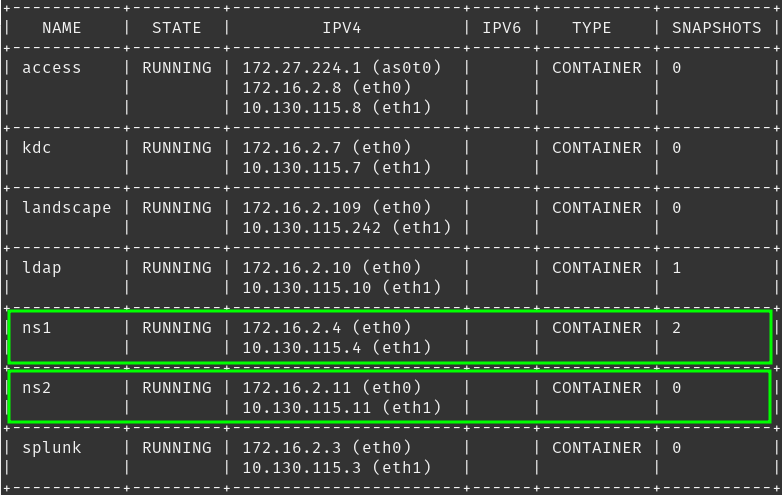
};As you can see from the configuration above, I have defined 4 Zones. 1 forward lookup zone (authoritative) for the domain name ‘linfra.loc’ and 3 others to represent the 3 network segments that hosts reside on in my lab for reverse resolution.
# Create the zones directory
jason@ns1:~$ sudo mkdir /etc/bind/zones

# Copy the template zone file included with bind to the new directory
jason@ns1:~$ sudo cp /etc/bind/db.local /etc/bind/zones/db.linfra.loc

jason@ns1:~$ sudo cp /etc/bind/db.local /etc/bind/zones/db.2.16.172

jason@ns1:~$ sudo cp /etc/bind/db.local /etc/bind/zones/db.1.16.172

jason@ns1:~$ sudo cp /etc/bind/db.local /etc/bind/zones/db.115.130.10
Now there are 3 essentially blank zone files ready for use. Before the server can resolve any names, each zone file has to have records added to represent the hosts that are on the network. I am going to go through each zone individually starting with the authoritative zone db.linfra.loc (linfra.loc). It is VERY important to remember to increment the Serial Number each time you edit any zone file or reloading the zone as well as zone transfers may fail.
# Add A records and NS records for the linfra.loc zone.
jason@ns1:~$ sudo vi /etc/bind/zones/db.linfra.loc

;
; BIND data file for local loopback interface
;
$TTL	604800
@	IN	SOA	linfra.loc. admin.linfra.loc. (
			     17		; Serial - Increment Me!
			 604800		; Refresh
			  86400		; Retry
			2419200		; Expire
			 604800 )	; Negative Cache TTL

; ## LOCAL LAN CONFIGURATION ##

; Nameserver records
@	IN	NS	ns1.linfra.loc.
@	IN	NS	ns2.linfra.loc.

; 172.16.2.0/24 - A Records
apollo.linfra.loc.	IN	A	10.130.115.1
apollo.linfra.loc.	IN	A	172.16.2.2
ns1.linfra.loc.		IN	A	172.16.2.4
ns1.linfra.loc.		IN	A	10.130.115.4
ns2.linfra.loc.		IN	A	172.16.2.11
ns2.linfra.loc.		IN	A	10.130.115.11
splunk.linfra.loc.	IN	A	172.16.2.3
splunk.linfra.loc.	IN	A	10.130.115.3
tower.linfra.loc.	IN	A	172.16.2.6
kdc.linfra.loc.		IN	A	172.16.2.7
kdc.linfra.loc.		IN	A	10.130.115.7
access.linfra.loc.	IN	A	172.16.2.8
access.linfra.loc.	IN	A	10.130.115.245
ldap.linfra.loc.	IN	A	172.16.2.10
ldap.linfra.loc.	IN	A	10.130.115.10
landscape.linfra.loc.	IN	A	172.16.2.109
landscape.linfra.loc.	IN	A	10.130.115.242
# Add A records and NS records for the 172.16.2.0/24 reverse zone.
jason@ns1:~$ sudo vi /etc/bind/zones/db.2.16.172
;
; BIND reverse data file for local loopback interface
;
$TTL 604800
@ IN SOA linfra.loc. admin.linfra.loc. (
14 ; Serial - Increment me!
604800 ; Refresh
86400 ; Retry
2419200 ; Expire
604800 ) ; Negative Cache TTL
;
; ### NAME SERVER CONFIGURATION ###
; NS records
@ IN NS ns1.linfra.loc.
@ IN NS ns2.linfra.loc.
; PTR records
2 IN PTR apollo.linfra.loc. :172.16.2.2
4 IN PTR ns1.linfra.loc. ;172.16.2.4
11 IN PTR ns2.linfra.loc. ;172.16.2.11
6 IN PTR tower.linfra.loc. ;172.16.2.6
7 IN PTR kdc.linfra.loc. ;172.16.2.7
3 IN PTR splunk.linfra.loc. ;172.16.2.3
8 IN PTR access.linfra.loc. ;172.16.2.8
10 IN PTR ldap.linfra.loc. ;172.16.2.10
109 IN PTR landscape.linfra.loc. ;172.16.2.109# Add A records and NS records for the 172.16.1.0/24 reverse zone.
jason@ns1:~$ sudo vi /etc/bind/zones/db.2.16.172
;
; BIND reverse data file for local loopback interface
;
$TTL 604800
@ IN SOA linfra.loc. admin.linfra.loc. (
8 ; Serial - Increment Me!
604800 ; Refresh
86400 ; Retry
2419200 ; Expire
604800 ) ; Negative Cache TTL
;
; ### NAME SERVER CONFIGURATION ###
; NS records
@ IN NS ns1.linfra.loc.
@ IN NS ns2.linfra.loc.
; PTR records
2 IN PTR apollo.linfra.loc. ;172.16.1.2Now that I have bind installed, all of the configuration directives in place in the main configuration files, logging setup and the zones created, it is time to see if there are any errors in the configuration. As part of the packages that I installed (dnsutils) there are a few handy tools that can be used to check your configuration/zone files for any mistakes called ‘named-checkconf’. I am going to run this against all of my configuration files (and deliberately make an error) below. I suggest you do the same before restarting the bind service. It can save you some frustration! If there is no output when this is run against the files, then you are good to go, else, it will complain and tell you which line you have a syntax or other error as well as give you clues as to what the issue may be. If there are errors, go review the file(s) at the lines indicated and fix them. Typically, it is misspellings, syntax errors or invalid IP addresses. See ‘man binnd-checkconf‘ for additional details and options.
# Check the syntax of the configuration files using named-checkconf.
jason@ns1:~$ sudo named-check-conf /etc/bind/named.conf.options

jason@ns1:~$ sudo named-check-conf /etc/bind/named.conf.local

# What an error (syntax) looks like (intentional mistake)
jason@ns1:~$ sudo named-checkconf /etc/bind/named.conf.options
/etc/bind/named.conf.options:8: missing ';' before 'options'
Also available is named-checkzone, which basically does the same thing as named-checkconf but against zone files. I also highly recommend that you run this against your newly created zone files to ensure that they are error free. The command similar syntax and output, so I am not going to demonstrate it here. See ‘man bind-checkzone‘ for additional details and options.
If all went well above – or you have fixed any issues that you have discovered, it is time to restart the bind service and see if all is good in the world. If it is – GREAT! – if it is not – take a read through this article a second time as well as your configuration files/zone files and fix any errors. Below I will also perform some name resolution tests against the new server.
# Restart bind service
jason@ns1:~$ sudo systemctl restart bind9.service

# Test name resolution (nslookup)
jason@apollo:~$ nslookup
> server ns1.linfra.loc
Default server: ns1.linfra.loc
Address: 172.16.2.4#53
Default server: ns1.linfra.loc
Address: 10.130.115.4#53
> msn.com
Server:		ns1.linfra.loc
Address:	172.16.2.4#53

Non-authoritative answer:
Name:	msn.com
Address: 204.79.197.219
> linfrastructure.net
Server:		ns1.linfra.loc
Address:	172.16.2.4#53

Non-authoritative answer:
Name:	linfrastructure.net
Address: 174.138.32.193
> ns2.linfra.loc
Server:		ns1.linfra.loc
Address:	172.16.2.4#53

Name:	ns2.linfra.loc
Address: 172.16.2.11
Name:	ns2.linfra.loc
Address: 10.130.115.11
> ldap.linfra.loc
Server:		ns1.linfra.loc
Address:	172.16.2.4#53

Name:	ldap.linfra.loc
Address: 10.130.115.10
Name:	ldap.linfra.loc
Address: 172.16.2.10
Looking at the output above, I was able to perform internet lookups as well as lookups on the records that I defined for the servers in my lab. All is looking good! Next I will configure a secondary name server and allow zone transfers (which is already in my configuration above for the primary [this server – ns1] in /etc/bind/named.conf.local and /etc/bind/named.conf.options).
Configuring a secondary name server
As mentioned earlier in this article, I am also going to deploy and configure a secondary name server for redundancy. Luckily, this process is not quite as involved and consists of essentially the same steps as above, minus the configuration of zone files, as they will be transferred from the primary. As a matter of fact, most configurations can be copied from above and adjusted slightly.
# Installing Bind and dnsutils
jason@ns2:~$ sudo apt install bind9 dnsutils
On a secondary name server, bind does not store the zone files under the /etc file structure. We will need to create the directory under /var/lib to allow bind to have write permissions to perform zone transfers and update zones as outlined below.
# Create zone file directory and set appropriate permissions.
jason@ns2:~$ sudo mkdir /var/lib/bind

jason@ns2:~$ suco chgrp bind /var/lib/bind
I am going to edit the /etc/bind/named.conf.options file and copy/paste the configuration from my primary server to the secondary and make a few adjustments. The only change that needs to be made here is the ‘allow-transfer’ option, which should be changed to the IP address(s) of the primary name server.
# Edit the named.conf.options file for the secondary server.
jason@ns2:~$ sudo nano /etc/bind/named.conf.options

acl linfra-lan {
	172.16.1.0/24;
	172.16.2.0/24;
	10.130.115.0/24;
};


options {
	directory "/var/cache/bind";

	recursion yes;
	allow-recursion { linfra-lan; };
	listen-on { any; };
	allow-transfer { 172.16.2.4; 10.130.115.4; };

	forwarders {
		208.67.222.222;
		8.8.8.8;
		208.67.220.220;
		8.8.4.4;
		1.1.1.1;
		1.0.0.1;
		};

	// If there is a firewall between you and nameservers you want
	// to talk to, you may need to fix the firewall to allow multiple
	// ports to talk.  See http://www.kb.cert.org/vuls/id/800113

	// If your ISP provided one or more IP addresses for stable
	// nameservers, you probably want to use them as forwarders.
	// Uncomment the following block, and insert the addresses replacing
	// the all-0's placeholder.

	// forwarders {
	// 	0.0.0.0;
	// };

	//========================================================================
	// If BIND logs error messages about the root key being expired,
	// you will need to update your keys.  See https://www.isc.org/bind-keys
	//========================================================================
	dnssec-validation no;

	listen-on-v6 { any; };
};

//# Configuration to enable additional logging. (optional).
logging {
        channel transfers {
            file "/var/log/bind/transfers" versions 3 size 10M;
            print-time yes;
            severity info;
        };
        channel notify {
            file "/var/log/bind/notify" versions 3 size 10M;
            print-time yes;
            severity info;
        };
        channel dnssec {
            file "/var/log/bind/dnssec" versions 3 size 10M;
            print-time yes;
            severity info;
        };
        channel query {
            file "/var/log/bind/query" versions 5 size 10M;
            print-time yes;
            severity info;
        };
        channel general {
            file "/var/log/bind/general" versions 3 size 10M;
        print-time yes;
        severity info;
        };
    channel slog {
        syslog security;
        severity info;
    };
        category xfer-out { transfers; slog; };
        category xfer-in { transfers; slog; };
        category notify { notify; };

        category lame-servers { general; };
        category config { general; };
        category default { general; };
        category security { general; slog; };
        category dnssec { dnssec; };

        // category queries { query; };
};
As I did on the primary, I have also added the additional logging configuration to this secondary – which means that the logging directory needs to be created and the permissions set and the AppArmor configuration adjusted. If you choose to take this route as well (optional) you must configure AppArmor to allow the logging as well as setup the logging directory manually with the correct permissions, as follows.
## This is optional | only necessary if you configured logging ##
# Create the logging directory
jason@ns2:~$ sudo mkdir /var/log/bind

# Set the appropriate permissions on the log directory
jason@ns2:~$ sudo chown bind /var/log/bind/

# Edit AppArmor configuration to allow logging
jason@ns2:~$ sudo vi /etc/apparmor.d/usr.sbin.named

......
  # /etc/bind should be read-only for bind
  # /var/lib/bind is for dynamically updated zone (and journal) files.
  # /var/cache/bind is for slave/stub data, since we're not the origin of it.
  # See /usr/share/doc/bind9/README.Debian.gz
  /etc/bind/** r,
  /var/lib/bind/** rw,
  /var/lib/bind/ rw,
  /var/cache/bind/** lrw,
  /var/cache/bind/ rw,
  /var/log/bind/** rw,
  /var/log/bind/ rw,
......

# Restart the AppArmor service
jason@ns2:~$ sudo systemctl restart apparmor.service
Now that I have the /etc/bind/named.conf.options file configured to allow zone transfers from the primary, I will move on to the /etc/bind/named.conf.local file where I will define the zones. Note that the zones on the secondary server live in a different directory (/var/lib/bind) as outlined in the section above. Also not the addition of the ‘primaries’ directive, which tells the secondary who the primary name servers in the environment are.
# Modify the /etc/bind/named.conf.local file and define zones
jason@ns2:~$ sudo vi /etc/bind/named.coonf.local

//
// Do any local configuration here
//

// Consider adding the 1918 zones here, if they are not used in your
// organization
//include "/etc/bind/zones.rfc1918";

zone "linfra.loc" {
	type secondary;
	file "/var/lib/bind/db.linfra.loc";
	allow-transfer { 172.16.2.4; 10.130.115.4; };
	primaries { 172.16.2.4; 10.130.115.4; };
};

zone "2.16.172.in-addr.arpa" {
	type secondary;
	file "/var/lib/bind/db.2.16.172";
	allow-transfer { 172.16.2.4; 10.130.115.4; };
	primaries { 172.16.2.4; 10.130.115.4; };
};

zone "1.16.172.in-addr.arpa" {
        type secondary;
        file "/var/lib/bind/db.1.16.172";
        allow-transfer { 172.16.2.4; 10.130.115.4; };
	primaries { 172.16.2.4; 10.130.115.4; };
};

zone "115.130.10.in-addr.arpa" {
        type secondary;
        file "/var/lib/bind/db.115.130.10";
        allow-transfer { 172.16.2.4; 10.130.115.4; };
	primaries { 172.16.2.4; 10.130.115.4; };
};
Now, like we did above while configuring the primary, it is a good idea to check your configuration files for errors using bind-checkconf and bind-checkzone. I am not going to go over this again here, see the section above for more detail.
If everything checks out with your configuration, it is time to restart the bind service and test to ensure that your name server is properly resolving named – both internal (authoritative) and external (recursive).
# Restart bind service
jason@ns1:~$ sudo systemctl restart bind9.service

# Test name resolution (nslookup)
jason@apollo:~$ nslookup

> server ns2.linfra.loc
Default server: ns2.linfra.loc
Address: 10.130.115.11#53
Default server: ns2.linfra.loc
Address: 172.16.2.11#53
> godaddy.com
Server:		ns2.linfra.loc
Address:	10.130.115.11#53

Non-authoritative answer:
Name:	godaddy.com
Address: 208.109.192.70
> homedepot.com
Server:		ns2.linfra.loc
Address:	10.130.115.11#53

Non-authoritative answer:
Name:	homedepot.com
Address: 35.201.95.83
> landscape.linfra.loc
Server:		ns2.linfra.loc
Address:	10.130.115.11#53

Name:	landscape.linfra.loc
Address: 10.130.115.242
Name:	landscape.linfra.loc
Address: 172.16.2.109
> access.linfra.loc
Server:		ns2.linfra.loc
Address:	10.130.115.11#53

Name:	access.linfra.loc
Address: 172.16.2.8
Name:	access.linfra.loc
Address: 10.130.115.245
Conclusion
That about wraps things up on the basics of configuring a bind DNS infrastructure. There are TON more options and configurations, best-practices and use-cases that are to be had when it comes to DNS. This is just a very basic setup in my lab. If you really want to gain a complete understanding of bind and DNS in general, there are a lot of resources available on the internet. A few that I found particularly useful while building my setup are below.
Bind9 Documentation: BIND 9 Docs (ISC)
Ubuntu DNS Service: Bind Install/Configure (Ubuntu)