Pop!_OS 22.04 | Building an LXD Lab
Adventures in the LXD Lab | In the beginning there was….
If anyone has read other articles in my ‘Adventures in the LXD Lab’ series, you probably surmised that the lab already existed…Shocker – it did. I am writing this article post-lab creation to outline how I built the lab and how my LXD is configured. Compared to those Installing OpenLDAP and Installing Kerberos articles, this one is relatively short (and fun). You may also have noticed the mention of Pop!_OS in the title of this article…Well, that is because on my production desktop, Pop!_OS is my ‘Distro of Choice’ and has been for about 2 years steady now. (P.S. If you have not tried Pop!_OS – GET ON IT!!).
Because I do not have any ‘relevant’ server gear around (meaning any that will run a more recent OS – best I can do is Ubuntu 16.04 on my OLD HP Proliant DL380) and I have really good specs on my daily driver desktop running Pop!_OS 22.04 – I went with making that the host for my lab. In addition, this is LXD, a container technology that is super light on resources to begin with but can also be configured with limits for your containers, which we will discuss. Read on.
Setting up my Pop!_OS host
Pop!_OS, while an Ubuntu derivative, does not use Snaps (snapd) and favors Flatpak (which I love) so, for this I decided to install it and follow the Ubuntu vein when it comes to installing and managing LXD in my environment. If you are running Ubuntu, no need to pay attention to the following.
# Install Snap
jason@apollo:~$ sudo apt install snapd

# Install LXD in Snap
jason@apollo:~$ snap install lxd
Its that easy folks. We now have snapd installed along with LXD. All that must be done now is configure LXD to my liking and start launching containers!
Configuring LXD
The initial configuration of LXD is fairly straight forward. You run through a wizard and answer a few questions about how you want the environment configured (I accepted all defaults this go) and at that point, you are ready to launch containers. BUT – I plan to customize my setup to meet some of my needs, as follows.
# Run lxd init and answer prompts appropriately for your environment
jason@lxd1:~$ sudo lxd init
For networking, I prefer to have the containers have 2 network interfaces. One connects to my local LAN and acts as the public facing interface using macvlan. The other uses the lxdbr0 connection on eth0 as a sort of management or host only network, which is the network created above when running lxd init. Below, I will create the macvlan that allows my containers to connect to my local LAN. The interfaces in my containers will get an IP address from my LAN DHCP server, just like a physical machine would.
# Create macvlan network for direct LAN access.
jason@lxd1:~$ lxc network create macvlan -t macvlan parent=enp0s3
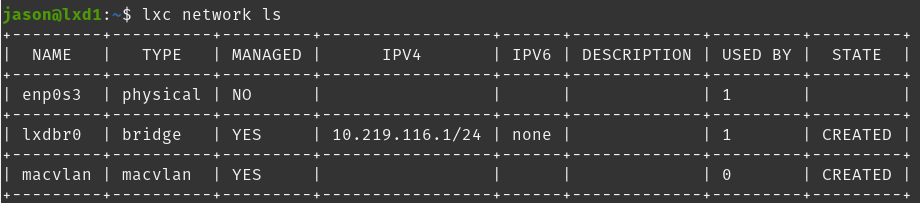
Network macvlan createdAs shown below, I now have 2 networks. The ‘management’ network at lxdbr0 and a macvlan network that will put containers on my local LAN.
Now, on to the profiles that the container will use. This is where I will tell LXD to create the containers with 2 network interfaces. I am also going to set some CPU and RAM limits on my containers so no single one starves the other – or my host – of resources. I am going to use the default profile for this purpose, but you can create a new profile if you like.
# Edit the default profile to my liking.
jason@lxd1:~$ lxc profile edit default
### This is a YAML representation of the profile.
### Any line starting with a '# will be ignored.
###
### A profile consists of a set of configuration items followed by a set of
### devices.
###
### An example would look like:
### name: onenic
### config:
### raw.lxc: lxc.aa_profile=unconfined
### devices:
### eth0:
### nictype: bridged
### parent: lxdbr0
### type: nic
###
### Note that the name is shown but cannot be changed
config:
limits.cpu: 2
limits.memory: 2048MB
description: Primary Profile - 2CPU | 2GB RAM
devices:
eth0:
nictype: macvlan
parent: enp0s3
type: nic
eth1:
name: eth1
network: lxdbr0
type: nic
root:
path: /
pool: data
type: disk
name: default
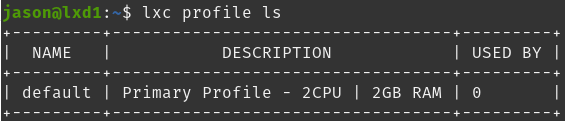
used_by: []As shown below, the default profile (which I found cannot be deleted or renamed) has the description that I set in the configuration and should deploy containers with a 2 CPU and 2GB RAM limit. Next I will test that theory.
Now that we have the LAN network created, default profile configured to use both networks and limit the resources – it is time to test out a container or 2 on the new setup.
# Launch the first container - Ubuntu of course
jason@lxd1:~$ lxc launch images:ubuntu/22.04 ubuntu
Creating ubuntu
Starting ubuntu
Now we have a fresh Ubuntu container running on our LXD host – but wait – there is only one NIC!. That is expected in this case as the OS itself needs a configuration for the second NIC. I will setup the second NIC next so that each time this machine is started, it will have both NIC’s.
# Launch bash on the container to gain console access
jason@lxd1:~$ lxc exec ubuntu bash
# Tell netplan configuration about the second NIC
root@ubuntu:~# nano /etc/netplan/10-lxc.yaml
network:
version: 2
ethernets:
eth0:
dhcp4: true
dhcp-identifier: mac
eth1:
dhcp4: true
dhcp-identifier: mac
# Apply the new network configuration
root@ubuntu:~# netplan apply
# Make sure the container got an IP for the second NIC
root@ubuntu:~# ifconfig
eth0: flags=4163<UP,BROADCAST,RUNNING,MULTICAST> mtu 1500
inet 172.16.2.131 netmask 255.255.255.0 broadcast 172.16.2.255
inet6 fe80::216:3eff:fe43:f2e3 prefixlen 64 scopeid 0x20<link>
ether 00:16:3e:43:f2:e3 txqueuelen 1000 (Ethernet)
RX packets 9 bytes 2478 (2.4 KB)
RX errors 0 dropped 0 overruns 0 frame 0
TX packets 32 bytes 3832 (3.8 KB)
TX errors 0 dropped 0 overruns 0 carrier 0 collisions 0
eth1: flags=4163<UP,BROADCAST,RUNNING,MULTICAST> mtu 1500
inet 10.219.116.163 netmask 255.255.255.0 broadcast 10.219.116.255
inet6 fe80::216:3eff:fe01:349b prefixlen 64 scopeid 0x20<link>
ether 00:16:3e:01:34:9b txqueuelen 1000 (Ethernet)
RX packets 152 bytes 216004 (216.0 KB)
RX errors 0 dropped 0 overruns 0 frame 0
TX packets 150 bytes 11405 (11.4 KB)
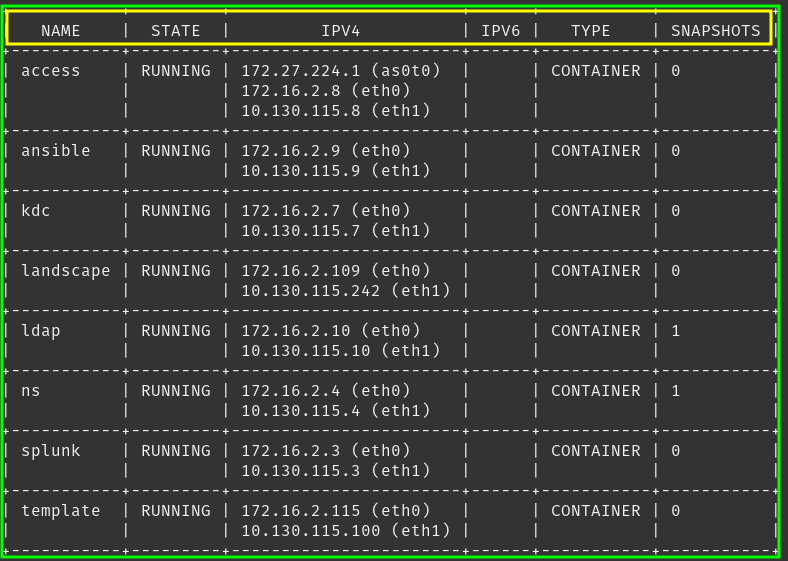
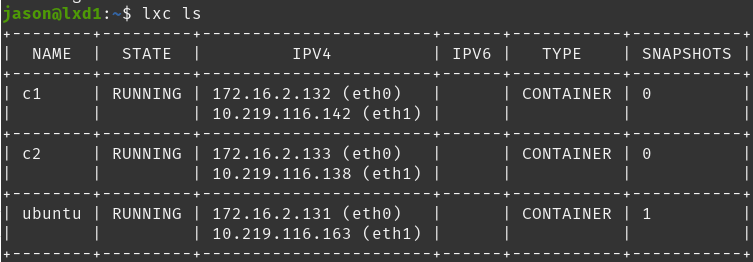
TX errors 0 dropped 0 overruns 0 carrier 0 collisions 0All looks good above with the network. Now I can check to make sure LCD also sees the new NIC by running lxc ls on the host.

To avoid having to repeat the process in each container, I am going to make an image of this container that I can later launch for new containers that I plan to use. This will save some time in the future. It is also a good idea to install any common software that you use regularly before creating the image, such as htop, openssh-server, net-tools and the like. You may also choose to create a user and copy your ssh key(s) to the container before creating the image. The possibilities are endless, I am going simple for this demonstration.
# Create the snapshot of the container
jason@lxd1:~$ lxc snapshot ubuntu template

# Create the image from the snapshot just created
jason@lxd1:~$ jason@lxd1:~$ lxc publish ubuntu/template --alias custom-template description="starter container"
Now I have a custom container image that I can use to launch future Ubuntu containers with my default configuration and software pre-installed. I will give that a shot next and see if both NIC’s automatically come online at launch.

jason@lxd1:~$ lxc launch custom-template c1
Creating c1
Starting c1
jason@lxd1:~$ lxc launch custom-template c2
Creating c2
Starting c2
I have launched 2 containers using the newly created ‘custom-template’ image and it looks like they both came up with both NIC’s configured and functioning as expected.
Conclusion
So, now I have a basic lab setup and ready to start building test machines and having fun. There are a lot of other configurations that can be accomplished with LXD. In future articles, I am going to build a number of servers and services – so look out for those. I encourage you to also play with LXD. It is a great way to quickly build small and large scale, efficient containers.